--------------------------------------------------------------------------------
Mostrando entradas con la etiqueta postres. Mostrar todas las entradas

miércoles, 28 de marzo de 2012

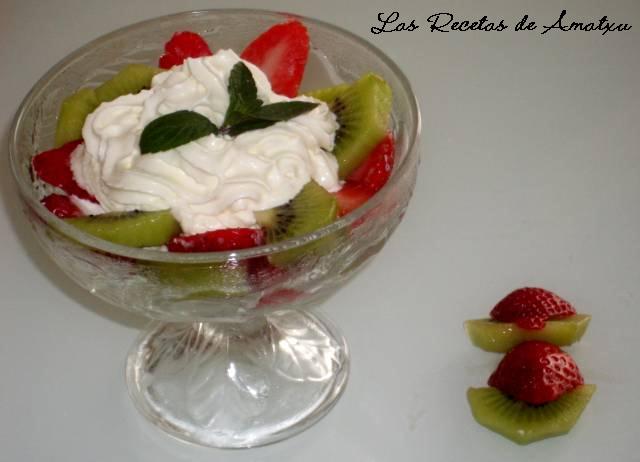
FRESAS Y KIWIS CON NATA/KIWI AND STRAWBERRY WITH CREAM

La estación de las fresas ya ha empezado en España, asi que es buen momento para tomar de postre fresas con nata, a mi me gusta también ponerle trocitos de kiwi, probarla asi y ya vereis que delicia¡¡

Ingredientes para 1 copa:

1 kiwi
3 fresas grandes o fresones
Nata montada

Cortar las fresas y los kiwis en laminas, poner un poco de nata en la base de la copa, ir añadiendo una lamina de kiwi y otra de fresa, poner otro poco de nata y añadir otra fila de fruta, terminar con un poco de nata montada y adornar con menta.

Strawberry season has just started in Spain, and it is a good moment to eat as dessert strawberries with cream, i also like to add them kiwi. Try it¡¡ you will see it is delicious¡¡

Ingredients for 1 cup:
1 kiwi
3 big strawberries
Cream

Cut in slices the kiwi and the strawberries, put a bit of cream in the base of the cup, add alternating one slice of kiwi and one of strawberry, add a bit more cream and repeat the operation, finishing with a touch of cream and decorate with a mint leaf.


miércoles, 14 de marzo de 2012

TARTA SELVA NEGRA /BLACK FOREST CAKE

Para celebrar el primer año del blog he elegido hacer una tarta, aunque ya sabeis que lo mio no es la reposteria pero al menos lo intento, decir que tengo unos amigos que me quieren mucho y que siempre se prestan a hacer de "conejillas de indias" pero tambien son muy criticos conmigo y me dicen lo que le suele sobrar o faltar a la receta, asi aprendo más rápido¡¡ La receta la he cogido de un precioso libro que se llama "La Cocina dulce" del maestro repostero Paco Torreblanca, he de puntualizar que hay algunas cosas de su receta que he modificado ligeramente porque los hornos varian mucho de unos a otros. Pero vamos por partes porque esta tarta es un poquito larga de explicar:

To celebrate the first year of my blog i have choosen to make a cake, although you know i am not very good in making cakes at least i try to do my best¡¡ i have to say that i have friends who love me very much and they are always willing to do as "guinea pigs" but on the other hand they are also very critical to me and i learn a lot with their comments. This recipe is from a nice book called "La Cocina dulce" The Sweet Cousine" from the famous baker Paco Torreblanca. I have change a bit this recipe as ovens vary from one to others.


1ª parte: Hacer el bizcocho de chocolate/ 1st: Make the chocolate base
Ingredientes/Ingredients
7 yemas de huevo/ egg yolks
270 gramos de azucar/sugar
70 ml agua/water
6 claras/ white eggs
230 gramos de harina floja/loose flour
35 gramos de cacao /cocoa

Montar las yemas con la mitad del azucar. Cuando estén semimontadas ir agregando poco a poco el agua.
Whisk the yolks with half of the sugar.When they are semi-whisked add slowly the water.
Montar las claras con la otra mitad del azucar. Whisk the whites with the other sugar half.

Mezclar las yemas con las claras
Mix the yolk with the whites

Agregar la harina floja (harina de bajo contenido en proteina) y el cacao y mezclar con cuidado
Add with care the flour (flour with low content on protein) and the powder cocoa and mix.
Meter en el horno, segun él a 240ºC durante 10 minutos, yo recomiendo que la bandeja se ponga en la parte baja del horno y que lo tengas a 200ºC durante 15 o 20 minutos con cuidado que no se te queme pero se haga bien por dentro, eso también depende del horno de cada uno.
Introduce it in the oven, the baker said at 240ºC during 10 minutes, but this depends on the oven, in mine i have put the tray in the low part of the oven at a temperature of 200ºC during 15 to 20 minutes with care the cake does not burn but it is done in the inside.
2ª parte: Hacer la crema de trufa /2nd part: Make the truffle cream

Ingredientes/Ingredients
1 litro de nata /1 litre of cream
100 gramos de azucar/sugar
50 gramos de cacao en polvo/cocoa

Mezclar todos los ingredientes y montarlos con la batidora hasta que se espese un poco y quede cremosa.
Mix all the ingredients in the mixer until it becomes creamy


3ª parte: Almibar de ron
3rd.part:  Rum syrup
Ingredientes/Ingredients
1 litro de agua/ water
400 gramos de azucar /sugar
15 ml de ron /rum

Mezclar el agua con el azucar en un cazo, poner al fuego hasta que llegue al punto de ebullición y retirar
Mix the water with the sugar in a small saucepan, until it boils then take apart, once it is cold add the rum
Cuando la mezcla anterior esté fría , añadir el ron

Montar la tarta /Cake assembly
Cortar el bizcocho en tres discos, bañarlos en el almibar de ron
Cut the cake in 3 discs, soak them in the rum syrup

Poner en una fuente un papel film transparente, colocar el primer disco y rellenarlo con la crema de trufa,
poner el segundo disco y volver a rellenarlo de la crema de trufa
Put in a tray transparent film, place the first disc and fill it with the truffle cream, put the second disc and fill it with the cream.

Añadirle el tercer disco, cubrir con el plastico y meter la tarta en el congelador un rato
Add the third disc, cover with the plastic and put in the freezer for a while

Sacar la tarta del congelador, extender la trufa restante.
Take out the cake from the freezer, cover with the remaining truffle cream
Rallar la tableta de chocolate con un cuchillo y esparcir las virutas por encima de la tarta
Grate the chocolate tablet with a knif and spread the chocolate shavings over the cake
Espolvorear con cacao en polvo
Spread also pure chocolate powder


sábado, 25 de febrero de 2012

BUÑUELOS DE AIRE/ AIR-FRITTERS


A la tercera va la vencida¡¡ después de hacer por dos veces la masa de buñuelos con levadura de panaderia y una salirme muy liquida y la otra muy espesa, siguiendo exactamente las indicaciones de mi amatxu, pues es la primera vez que los hago, pero  no soy de las que me doy por vencida y soy bastante terca¡¡ asi que mi amatxu me dijo (la llamé como quinientas mil veces..) la receta la tiene tu cuñada¡¡ pues ahi va su receta, más facil de trabajar porque no le pone levadura de panaderia sino royal, porque segun ella tampoco le sale con la otra levadura (vaya par de reposteras¡¡)
Por otra parte decir que estos buñuelos son los más sencillos que hay porque no llevan mantequilla, ni huevos como he podido ver en otras muchas recetas que hay por la web.

Ingredientes
2 vasos de agua templada
350 gramos de harina
1 pizca de sal
4 cucharadas soperas de levadura Royal o similar

En un bol se pone el agua templada con la levadura y se le va añadiendo poco a poco la harina, ir mezclando hasta que sea una masa suave, ni muy liquida ni muy espesa. Dejar reposar media hora, es importante que no esté donde haya corrientes y en un rincón templado.

Poner una sarten bien llena de aceite y calentar, cuando el aceite este bien caliente, con una cuchara y ayudados por el dedo ir echando trozos de la masa, bajar el fuego porque queremos que la masa se haga bien por dentro y no se queme por fuera.
Ir sacando a un plato con papel de cocina para escurrir el exceso de aceite, rebozar los buñuelos en azucar y comer, podeis hacer chocolate para mojar los buñuelos en ella¡¡¡ A los peques de la casa les va a encantar¡¡ a mi los buñuelos me llenan de recuerdos de mi niñez, siempre jugabamos a adivinar que formas de animal podian tener los buñuelos, patos,elefantes, mencionabamos todo el zoologico y es que cuando se es pequeño se tiene una gran imaginación¡¡

There is no three without two, it is a Spanish saying, i have done 3 times this recipe, as it is at the beginning a bit difficult to find the right touch to the pastry, the first time it became very liquid, the second one to thick, regardless of my mum indications, now this third time is the right one¡¡ as you can notice i am a bit pigheaded¡¡

Ingredientes
2 glasses of warm water
350 grames of white flour
1 bit of salt
4 big spoons of  yeast

In a bowl put the warm water with the yeast, add gradually the white flour, mix until it becomes a soft batter, not too liquid nor too thick. Leave it settle for half an hour, it is very important that you do not leave it within drafts and place it in a warm place

Put a lot of olive oil in a saucepan and heat it, once it is well hot, with the help of a spoon we put bit of this batter into the saucepan, you will send that the pastry will expand, low down the fire as we want the pastry  is well done inside but not burnt in the outside.
Place the fritters in a plate with a papercloth to take out the excess of oil, then cover the fritters with sugar and if you want, made a hot chocolate. Your children will love this¡¡

viernes, 27 de enero de 2012

TARTA AL PINTOR/PAINTER´S CAKE

He pensado que después de las alcachofas rellenas y del asado de cordero vendria bien un postre, esta receta es facil de hacer y como tenía que ponerle un diseño que mejor  puede haber para estas fechas que se acercan de San Valentin  que "un te quiero" ?, disculpar y perdonad las manazas pues el pulso no lo tengo muy fino y el dibujo no es lo mio¡¡¡  pero le podeis poner cualquier diseño o dibujo que os apetezca.

Ingredientes:
150 gramos bizcochos de soletilla
3 huevos
3 cucharadas de azucar
300 gramos de queso en crema
Cognac
Leche
1 tacita de cafe concentrado
1 cucharada de cacao
1 cucharada de maizena

En un cuenco mezclais las yemas de los huevos y el azucar hasta que estén espumosas, le añadis el queso  en crema y luego incorporais las claras de huevo que previamente las habreis montado a punto de nieve firme

Cogeis una fuente honda bonita que tengais,  colocais una capa de las soletillas bañadas en cognac con un poco de leche, hecho esto le vertis la crema de queso encima.

En un cacito poneis el cacao, azucar y la maizena removeis viendo y vais añadiendo el café, removiendo bien hasta que se quede espesa.

Con una cuchara vais vertiendo este almibar por encima de la tarta, si preferis podeis usar una jeringilla para hacerlo más fino, seguro que os quedan unos dibujos más bonitos¡¡

Meteis la tarta en la nevera y esperais durante unas dos o tres horas para servirla,

I have thought that after the stuffed artichokes and the lamb´s leg, the ideal would be to do a cake, this recipe is easy and you can do some design on the top of it, Valentine´s day is coming near and what best to do than to put a heart and "I love you" on the top? i beg your pardon for my awful design but my hands are not done for drawing¡¡¡
Ingredients:
150 grames of sponge fingers
3 eggs
3 sugar spoons
Cognac
Milk
1 cup of strong black coffee
1 cocoa spoon
1 cornflour
In a bowl mix the egg´s yolks with the sugar until they become spongy, add the cheese cream and after this with care add the egg white foam.
Take a nice deep trays and put the sponge fingers soaked in cognac and milk, then pour the cheese cream mix.
In a small pan put the cocoa with the cornflour remove and pour slowly the coffee, until this syrup gets thick. With a spoon pour this over the top of the cake making the design you prefer, i am sure these designs will be better than mine¡¡

Place the cake in the fridge and wait for two or three hours before serving.

jueves, 22 de diciembre de 2011

PICATOSTES CON CHOCOLATE/BREADCRUMBS WITH CHOCOLATE

Es curioso como la comida hace que tu cerebro te devuelva ráfagas de tu memoria pasada, al comer estos picatostes me ha venido a la cabeza cuando era niña en Bilbao y de las tardes lluviosas y frias de invierno, acomodada en la mesa camilla de casa, jugando a la brisca con mi amama (abuela) Martina y ver a mi madre traer para merendar estos picatostes con una taza de chocolate calentito, esos son unos de mis recuerdos de infancia, y sinceramente el placer que me ha dado comerlos hoy no ha sido tanto por su sabor,que también, sino por la alegria que me ha dado volver por unos segundos a ese momento.
Ingredientes:
Pan duro del dia anterior
Aceite
Azucar
Chocolate para fundir
Leche (opcional)

Para el chocolate eso va a vuestro gusto, podeis coger el chocolate que más os guste, hacerlo con leche o sin ella, yo en mi caso he rallado un poco de chocolate negro puro y lo he mezclado con un poco de agua, mantenerlo caliente hasta la hora de servir.

Cogeis el pan y lo cortais en rodajas y a su vez estas rodajas las partis por la mitad, poner abundante aceite en la sarten y calentar el aceite bien, echar el pan y dar vueltas para que se dore pero no se queme. Sacar el pan y ponerlo en un plato con un papel absorbente para quitar el exceso de aceite, rebozarlo en azucar y servir junto con el chocolate

It is strange how food makes that our brain gives us flashbacks of our past, today when i have eating theses breadcrumbs came to my mind memories when i was a child in Bilbao and its cold and rainy afternoons, sitting at home, playing cards with my dear granny Martina and see that my mother gave us for tea-time the breadcrumbs and a hot chocolate. Those were ones of my dearest childhood memories and sincerely, the pleasure it gave me when eating these breadcrumbs today it has not been for the flavour but for the joy of the remembrance of those moments.

Ingredients:
Hard bread from the previous day
Olive Oil
Sugar
Chocolate
Milk (optional)

Doing the chocolate depends on one´s taste, you can choose your preferred chocolate, mix it with milk or just with only chocolate, in my case i have preferred pure black chocolate and mix it with a bit of water. Keep hot until you serve it.

Take the bread and cut it in loaves, cut the loaves in halves, put a lot of olive oil in the saucepan when it is hot add the bread and fry it until golden being careful on not burnt them. Take out the fried breadcrumbs and place them in a plate where you have put kitchen paper so you can take out the excess of oil, coated the breadcrumbs in sugar and serve together with the chocolate

jueves, 22 de septiembre de 2011

BIZCOCHO AL LIMON /LEMON CAKE

Como os comenté en mi post de la tarta de queso, nunca me han salido los bizcochos que hacia mi suegra a pesar de haberlo intentado muchas veces, y ahora creo el saber porque..el otro dia hablando con mi cuñada le comenté el tema y ella me dijo que tampoco le salia ese bizcocho a pesar de hacerlo paso a paso tal como mi suegra nos lo dijo, hemos llegado a la conclusión que el secreto para que ese bizcocho tan esponjoso y bueno se lo ha llevado mi suegra con ella a la tumba y que le ha faltado decirnos algun ingrediente o paso para que salgan bien. De todas maneras mi cuñada me ha dado la receta de un bizcocho muy facil de hacer y que no os va a dar problema ninguno, pues las medidas son las exactas y siempre os saldrá bien¡¡¡
Además como prometi a mis amigitos de y porque creceran? les hecho este bizcocho y la impresión que me ha dado  es que les ha gustado mucho, la señorita croqueta se empeñó en tomarlo de aperitivo y no esperó a tomarselo después de comer¡¡¡

Ingredientes
1 yogurt de limón (usar el vaso de este yogurt como medida para el resto de ingredientes)
3 huevos
2 vasos de azucar
3 vasos de harina
1 sobre de levadura Royal
1 vaso de aceite

1) Batir los huevos y echar el yogurt
2) Echar el azucar
3) Echar la harina y la levadura Royal
4) Echar el aceite

Mezclarlo todo bien, echar en un molde que previamente habeis untado con mantequilla, mientras ir calentado el horno unos minutos antes, introducir el molde en el horno y dejar a una temperatura de 180ºC durante unos 30 minutos o algo más, depende de cada horno. Sabreis que está hecho cuando con una aguja pincheis en el bizcocho y os salga limpio.
Ideas: podeis luego partir el bizcocho por la midad y untarlo con chocolate, o simplemente envolverlo todo en chocolate, eso va a vuestro gusto

As i commented in my cheese cake post, i never had made properly the cakes that my mother in law used to do despite the fact i have tried to do it a lot of times, now i think to know why...the other day talking to my sister-in-law i brought the subject and she replied to me that she also has tried to do thousand times with no success, therefore we have reached to the conclusion that the secret for that spongy cake has been taken by my mother in law to her tomb as we think we miss one ingredient or step when we do it. Anyway my sister in law has given me this simple recipe to do a nice cake, the measures have to be exact for the success of this cake, you will never fail¡¡¡
Also i promise to my dear little friends of why they do grow?  to make a cake for them, my impresion is that they liked a lot, as little Miss Croquette wanted to eat it as appetizer before the main meal instead of eating it as dessert¡¡¡

Ingredients:
1 lemon yogurt (use the package as the measure for the rest of ingredients)
3 eggs
2 cups of sugar
3 cups of white flour
1 bag of baking powder
1 cups of olive oil

1) Mix the eggs with the yogurt
2) Add the sugar
3) Add the flour and the baking powder
4) Add the olive oil

Mix everything properly, pour in a baking mould which you have previously greased  with butter, meanwhile preheat the oven for a few  minutes, introduce the baking mould in the oven and leave it a 180ºC during around 30 minutes, depends on the oven. You will know that it is done when you introduce a needle in the cake and it is clean.
Some ideas: you can open in half the cake and spread chocolate in it, or simply spread the chocolate all over the cake.


jueves, 8 de septiembre de 2011

MACEDONIA DE FRUTAS/FRUIT COCKATIL

Es una verdadera pena tirar la fruta que pronto se nos va a echar a perder en la nevera, en estos casos mi amatxu siempre recurria a la macedonia de fruta, pero esta vez le vamos a dar una presentación especial y en vez de ponerla en un bol la pondremos en una cesta de melon, si sois muchos en casa y quieres poner una gran cesta usa media sandia¡¡¡ Incluso le podeis hacer formas con los bordes, eso a vuestro gusto.
Ingredientes para 4 personas:
1 melon tipo galia o amarillo
1 platano
1 kiwi
1 manzana
1 pera
2 naranjas (1 para el zumo)
1 melocoton
1 racimo de uvas rojas
1 o 2 cucharadas azucar
1 chorro countreau ( si os gusta con alcohol)

Cogeis el melon lo partis por la mitad pero en sentido vertical para que se puede asentar bien la base, con una cuchara especial vais sacando el melon haciendo bolitas y las reservais, el jugo que queda al final lo poneis en un vaso
Coger el resto de las frutas excepto las uvas y las vais cortando a trocitos
Colocar todo dentro del melón
Echar azucar por encima
Exprimis una naranja y le echais el jugo con un poquito de cointreau (opcional)
Guardar en la nevera para que esté bien frio a la hora de servir.

It is a real pity to throw away the fruit that it is going to rippen in our fridge, in these cases my mother always did a fruit cocktail, but this time we are going to give a special presentation and instead of putting the cocktail in a bowl we are going to present in the melon, if  you are a lot at home then you can do it with a watermelon instead¡¡ Even you can give shape to the borders.

Ingredients for 4 persons:
1 galia or honeydew melon
1 banana
1 kiwi
1 apple
1 pear
2 oranges (1 for the juice)
1 peac
1 bunch of red grapes
1 or 2 sugar spoons
1 cointreau liquor (if you like alcohol-optional)
Take the melon and cut in a big half in vertical sense, with a special spoon made small balls of melon and reserve, take out the juice that it is left at the bottom of the melon and pour in a glass.
Take the rest of fruit, peel them and cut them in small slices
Place all the fruit inside the melon
Pour the sugar on the melon
With one orange make a juice, pour a bit of cointreau (optional)
Keep it the fridge and serve very cool

viernes, 5 de agosto de 2011

TARTA BELGA DE AZUCAR/BELGIUM SUGAR CAKE

Como os decia en mi post anterior de la tarta de queso, no soy buena repostera a pesar de haberlo intentando varias veces, pero esta vez la tarta de azucar es un postre que no suele fallar, puesto que la masa no hace falta que suba. Esta receta no es vasca pero desde pequeña se ha quedado en mi mente, puesto que mi tia que vive en Belgica me la ponía cada vez que venia a vernos a España, en los años 60 cuando España estaba despegando y ya no habia tanta hambre, ella siempre venia cargada de regalos y sobretodo de comida, la primera nocilla que probé fue con 2 años y recuerdo todavia el bote que se llamaba Kawata,


 era crema de cacao del Congo Belga, o las bananas (que no platanos) que eran enormes, también nos traia goffres hechos con su maquina especial o unas deliciosas crepes. El dia que llegaba recuerdo que parecía como si fuera Navidad y eran dias muy muy especiales donde nos reuniamos toda la familia para ponernos al dia de todas las cosas que nos habian pasado y comiamos todas las exquisiteces que ella traia..Aun hoy dia siempre nos trae chocolate belga que a mi gusto es el mejor tanto o mas que el suizo o inglés. No se porque los extranjeros son tan chocolateros pero imagino que será el clima tan triste que tienen que si no es por los bombones se les entristece la vida.

Ingredientes para 2 tartas (si quereis solo hacer una, coger exactamente la mitad, pero os diré que estan tan buenas que os comereis las dos seguro¡¡)
1/2 kilo de harina
2 huevos grandes o 3 pequeños
Pizca de sal
Levadura de panaderia
3/4 taza de leche
2 cucharadas soperas de azucar bien colmadas
1 huevo para batir con el azucar morena (150 gramos)
200 gramos de mantequilla

En un cuenco poneis la harina, haceis un hoyo en el centro y le echais los huevos y la mantequilla. Mientras en un cazo poner la leche con el azucar, se echa la levadura y se pone al lado del horno abierto, que no esté muy caliente y no hierva el cazo, notareis que esta hecho cuando la levadura se quede esponjosa.
Mientras, se mezcla bien la harina con los huevos y la mantequilla, luego le echais la leche con la levadura y seguis amasando hasta que veais que la masa ha chupado la leche y que se despega bien de las paredes del cuenco.

Entonces sobre la mesa poneis un poco de harina y seguis amasando la bola de masa en ella, dándole 10 golpes, seguis amasando un poco más y se le da otros 10 golpes, esto se hace para que la masa no tenga huecos. Una vez hecho ésto, se pone la masa en una bandeja de horno, se tapa con un paño limpio y se deja al lado del horno (éste a 40ºC) como minimo media hora para que se expanda la masa.
Luego untais el molde con mantequilla se parte la masa en 2 para hacer 2 tartas y extendeis en cada bandeja de horno la masa , con las manos pellizcais los bordes exteriores, en el centro pinchar suavemente con un tenedor en diagonal.

Batis el huevo y lo echais sobre la base de la masa, y empapar luego  bien con azucar moreno toda la masa. Mientras precalentar el horno a 230ºC durante unos 5 a 10 minutos, meteis la bandeja a 180ºC durante 15/20 minutos, primero poneis la bandeja en la parte baja del horno y luego la terminais de hacer en la parte de arriba para que se gratine el azucar.  Ya vereis como no os dejan nada en el plato¡¡ mi marido de momento para el postre se ha comido de una tacada 3 trozos grandes¡¡¡


As i told you in my previous post about the cheese cake, i am not a good pastry cook despite having tried a lot of times, but this time with the sugar cake is difficult to fail¡¡. This recipe is not basque but since i was little i have it in my mind, as my dear Auntie used to make it each time she returned to Spain from Belgium.

In the 60´s when Spain was starting to develop and there was no such hunger as in the past, she always came with loads of presents and food, the first chocolate spread cream i tried was with 2 years old and i still remember the jar of this choc-cream called Kawata, with cocoa from the Belgium Congo in Africa or the Bananas which were really big, also she made goffres done with a special machine or the delicious crepes. The day she arrived it was like Christmas time and we have such special moments about this, where all the family were reunited and we talked and ate with all the nice food she brought..Nowadays she still brings the belgium chocolate which to my taste it is much better than the Swiss one or even than the English one. I still do not know why foreigners loves so much chocolate but i gues it is due to the sad and cold weather, chocolate makes them be happier.

Ingredients for 2 cakes (if you want to do only one, then take exactly the half, but i will tell that they are so nice that you will eat them both¡¡)

1/2 kilo of white flour
2 big eggs or 3 small ones
A bit of salt
Fresh bakery yeast
3/4 of a glass of milk
2 spoonful of sugar
1 egg to whip with the brown sugar (150 grames)

In a bowl you put the flour, make a hole in the center and add the eggs and the butter. Meanwhile put in a small saucepan the milk with the sugar and the fresh yeast, open the oven and put the pan just above the door of the oven, having in mind that the milk can not boil, when you see the yeast becomes spongy means that it is ready. In the meantime, knead throughly the flour,eggs and butter, then add the yeast and milk until you see that the mixture has absorbed the milk and that it detachs from the bowl´s wall.

Then you put in the table a little bit of flour and keep kneading the mixture, give them 10 knocks with the mixture over the table, keep kneading a bit, then give another 10 knocks, this is made with the aim the mixture has no air or bubles inside. Once done this, put the mixture over a oven-tray, cover with a clean kitchen cloth and leave it besides the oven (at 40ºC) as minimum half an hour so the mixture can expand itself.

Put butter all around the oventray, divide the mixture in two to make 2 cakes and extend in each tray the mixture, with your hands pinch the borders of the mixture and with a fork pinch very softly the mixture in the middle in diagonal.Whip the egg and pour over the base of the extended mixture and soak well all around with the brown sugar.

Preheat the oven at 230ºC during 5 to 10 minutes, after introduce the tray and low down to 180ºC during 15/20 minutes, first you will put the tray in the low area of the oven, and before finish put the tray in the upper side.
You will see that your family will love this cake¡¡ my husband today has eaten three big portions¡¡¡


lunes, 25 de julio de 2011

TARTA DE QUESO/ CHEESECAKE

Tengo que decir en mis descargo, que no soy ni he sido nunca una buena repostera, he intentado por activa y por pasiva que los bizcochos que hacia mi suegra me salieran bien, a ella le salian tan altos y esponjosos y los mios nunca subian mas de 2 centimetros a pesar de seguir exactamente sus instrucciones...es una espinita que tengo clavada y una asignatura pendiente. Ahora se que depende de muchos factores, como hagas la masa, la temperatura ambiente, la posición en el horno, la temperatura del mismo..pero como soy muy terca, espero un dia poder conseguirlo y que mi marido pueda comer un buen bizcocho que le recuerde a los que hacia su madre.. mientras tanto os paso una receta que es muy muy facil y que no hace falta que tengais habilidades pasteleras.

Esta tarta de queso me la enseñó una buena amiga dueña de un hotel en el Pirineo Aragones, y tengo que decir que siempre sale muy rica. El único molde que tenia a mano tiene forma de corazón, lo sé es un poco hortera pero podeis usar los moldes con las formas y tamaños que querais.

Ingredientes:
1 molde con pestaña para que lo puedas abrir
200 gramos galletas tipo Maria
150 gramos mantequilla
1 tarro de queso philadelfia natural
5 cucharadas de azucar
2 briks pequeños de nata liquida para montar
1/4 agua hirviendo
1 sobre gelatina Royal o similar bien neutra o con sabor a limón

Con las galletas y la mantequilla haremos la base de la tarta, tienes que machacar las galletas, una vez echa mezcla con la mantequilla hasta que se haga una pasta espesa, untas el molde con un poco de mantequilla en la base y laterales y pones una capa gorda de la pasta de las galletas. Reservas

Bates el queso con el azucar, añades la nata liquida. Mientras haces ésto pones a hervir el 1/4 agua (un vaso) y le echas el sobre de gelatina, remueves bien y apartas.

Echas la gelatina sobre el queso y la nata y con la minipimer lo mezclas todo bien, cuando este un poco frio lo vuelcas en el molde. Lo metes en la nevera y esperas unas horas a que se cuaje todo bien. Una vez cuajado y antes de servir, untas la tarta con mermelada de la que mas os guste, en este caso he cogido un tarro de mermerlada de frutas del bosque que me encanta. Servir bien frio.

In my defense, i have to say i am not a good pastrycook, i have tried hard in many ways to do my mother´s in law special sponge cake with no success, she made them high and very spongy, mine they were no more high than 2 cm despite to follow exactly her cooking instructions.. I feel that I have a thorn in my side and it is an unresolved matter..but as i am very stubborn, i hope one day i can get it and that my husband can eat a sponge cake that reminds him slightly to those her mum used to do for him...meanwhile i enclose a very easy-to-do recipe for pastrycook beginners like me, you do not need to have with this pastry skills.

Ingredients:

1 mould with a flap for easy open
200 grams plain cookies
150 grams butter
1 can of cheese spread type Philadelphia or similar
5 spoons of sugar
2 briks of liquid cream
1/4 boiled water
1 small bag of jelly neutral or lemon flavour

 
With the cookies you have to smashed them and mix with the butter to do a hard pastry, then put a bit of butter all over the mould and introduce in the base a thick layer of this pastry.


Mix the cheese spread with the sugar, add the cream. Meanwhile you do this, boil the water (1 glass) and put the jelly inside, move well and add to the cheese and cream mix, then with the mixer whip well.

Once this done, cool it a bit and put it in the mould. Introduce it in the fridge and wait for some hours until the cake is well set. At the time of serving cover the cake with the jam you prefer, strawberry, cherries, in this case i have put fruits of the forest jam.


miércoles, 25 de mayo de 2011

TORRIJAS /FRENCH TOAST

Aunque este plato no es vasco, lo pongo porque mi abuela paterna era andaluza y mi madre lo suele hacer habitualmente, forma parte de los denominados "frutos de sarten" ,  tiene su origen en la Edad Media y era bastante usado porque se servia del pan duro de los dias anteriores, se hace principalmente en Semana Santa pero cualquier época de año es buena para tomarlas. Hay quien las hace con vino, en este caso las vamos a hacer clásicas con leche y canela.


Ingredientes:
Pan duro del dia anterior
Leche
Canela
Piel del limon
Azucar

Se pone a hervir la leche con un palo de canela en rama y la piel de un limón, mientras, se corta el pan en rodajas de un dedo de grosor y se colocan en una fuente honda. Cuando la leche haya hervido se quita la canela y la piel del limón y se echa sobre el pan, cuando el pan haya chupado la leche, se pone el pan sobre un trapo limpio. Se pasa por huevo y se van friendo con cuidado que no se quemen mucho, si haceis muchas mi consejo es que vayais cambiando el aceite para que no se os queden con aspecto quemado. Si no teneis pan duro, podeis usar pan de molde sin corteza cortado por la mitad aunque se quedaran mas finas de sabor estan igualmente ricas, como estas que hice por no tener pan duro a mano. A la hora de servir se pasan por una mezcla de azucar y canela (hay gente que le añade miel en su lugar). Quedan muy ricas también si se sirven junto a una bola de helado de vainilla o de turrón.

Although this is not a basque recipe, i put here as my father´s mother was from Andalusia and my mother used to do it, it forms part of the named " sauce-pan fruits", it has its origin in the Medieval ages and was often used due they used the hard bread from the previous days, we do it mainly in Easter time but you can cook it anytime of the year. There are people who makes them with wine but in this case we are going to do the clasic ones with milk and cinnamon.
Ingredients:
Stale Bread
Milk
Cinnamon
Sugar
Lemon skin

Boil the milk together with the lemon´s skin and the cinnamon stick, meanwhile cut the bread in thick slices of  1 finger width and place them in a deep tray. When the milk has boiled take out the cinnamon stick and the lemon´s skin and stir the milk on the bread, once the bread has soaked the milk , place it in a clean kitchen cloth. Coat the bread in beaten egg and fried in a sauce pan with olive oil, taking care in not burn them, if you are doing a huge quantity , then i advise to change the olive oil so they do not have a burn appearance. If you do not have stale bread then you can use loaf bread, although they will be thinner the taste will be equally good. When serving, coated them with a mix of sugar and cinnamon (there are people who prefer to coat them in honey). Also they are very tasty if you serve them together with vanilla ice-cream or nugat icecream.